On The Things Network’s public community network a Fair Use Policy applies which limits the uplink airtime to 30 seconds per day (24 hours) per node and the downlink messages to 10 messages per day (24 hours) per node. If you use a private network, these limits do not apply, but you still have to be compliant with the governmental and LoRaWAN limits. Fonte: Forum
O que é ChirpStack
ChirpStack no Ubuntu
Neste tutorial vou explicar passo a passo como configurar um Lora Gateway, neste caso o modelo LG01N da Dragino, juntamente com a plataforma ChirpStack.
Para isso vamos utilizar uma máquina virtual, o Ubuntu. Na criação da máquina virtual optei por utilizar o Virtualbox da Oracle.
Dica: Aconselha-se a fazer o download da imagem do Ubuntu 18.04.5, instalar e posteriormente instalar as dependências:

Isto vai permitir usar as funções do ubuntu na sua totalidade, como o copiar texto do pc e colar na máquina virtual por exemplo.
- Fazer o download do virtualbox: https://www.virtualbox.org/wiki/Downloads
- Instalar a versão adequada ao seu sistema operativo. (Neste caso usou-se o Windows).
- Fazer o download da imagem VDI do Ubuntu: https://www.osboxes.org/ubuntu/
- Escolher a versão adequada às necessidades, usou-se a versão 18.04
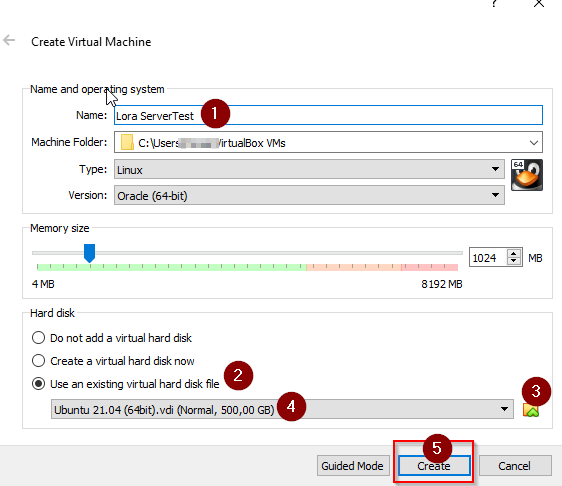
- Abrir o Virtualbox
- New

- Use an existing virtual hard disk file
https://www.osboxes.org/ubuntu/ - Add

- Selecionar a VDI descarregada anteriormente, por defeito estará na pasta Downloads.
- Choose
- Atribuir um Nome
- Create
- Iniciar a máquina virtual criada anteriormente
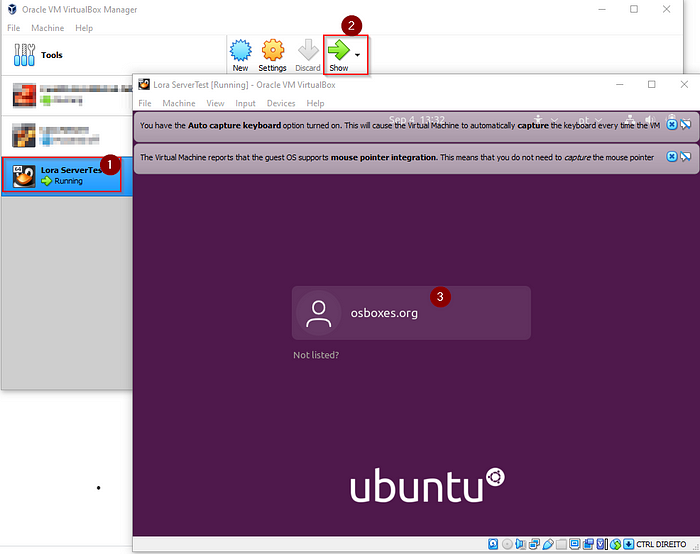
- A password por defeito da VDI descarregada anteriormente é: osboxes.org
- Ligar a porta LAN do Gateway ao PC
- Usou-se cabo UTP Cat5e
A ligação por defeito vai criar uma rede no PC, o IP gerado vai ser utilizado para fazermos as próximas configurações.
Neste momento temos tudo pronto para avançar para a fase três.
- Configurar a ligação Bridge nas definições da máquina virtual:
- Selecionar a máquina virtual
- Settings
- Network
- Esolher exatamente estas opções:
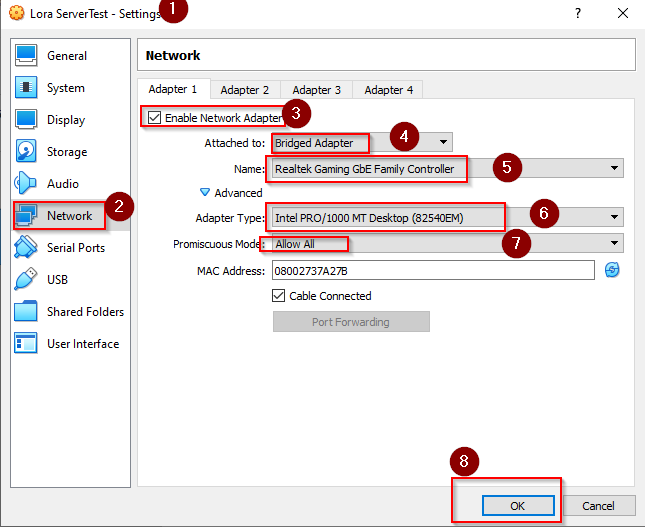
- O nome no ponto 5 pode variar conforme a máquina.
- Abrir o Ubuntu
- Reiniciar a máquina Virtual
Configurar o ChirpStack:
- sudo apt-get upgrade
- sudo reboot
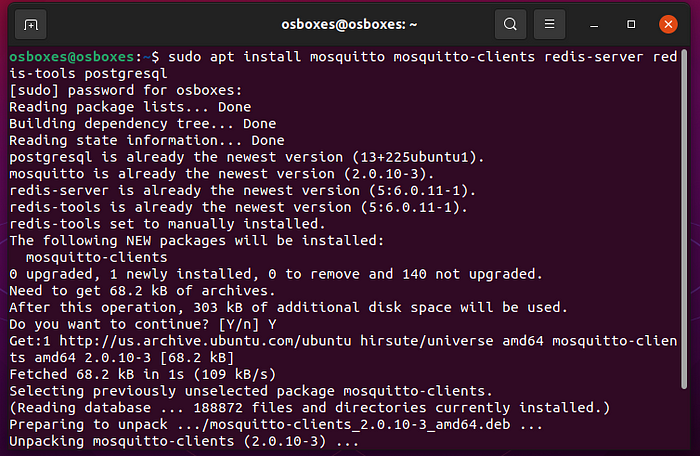
- Instalar as dependências do ChirpStack
sudo apt install mosquitto mosquitto-clients redis-server redis-tools postgresql
- Entrar na conta de postgreSQL
sudo -u postgres psql
- create role chirpstack_as with login password 'dbpassword';
- create role chirpstack_ns with login password 'dbpassword';
- create database chirpstack_as with owner chirpstack_as;
- create database chirpstack_ns with owner chirpstack_ns;
Mudar para ChirpStack Application Server Base de Dados:
- \c chirpstack_as
- create extension pg_trgm;
- create extension hstore;
Sair do psql:
- \q

Configurar a plataforma ChirpStack:
- sudo apt install apt-transport-https dirmngr

- sudo apt-key adv --keyserver keyserver.ubuntu.com --recv-keys 1CE2AFD36DBCCA00

- sudo echo "deb https://artifacts.chirpstack.io/packages/3.x/deb stable main" | sudo tee /etc/apt/sources.list.d/chirpstack.list
- sudo apt update

Instalar a ChirpStack Gateway Bridge na máquina virtual:
- sudo apt install chirpstack-gateway-bridge

Iniciar o serviço e definir para iniciar sempre que a máquina virtual ligar:
Iniciar o chirpstack-gateway-bridge:
- sudo systemctl start chirpstack-gateway-bridge
Iniciar o chirpstack-gateway-bridge no arranque:
- sudo systemctl enable chirpstack-gateway-bridge
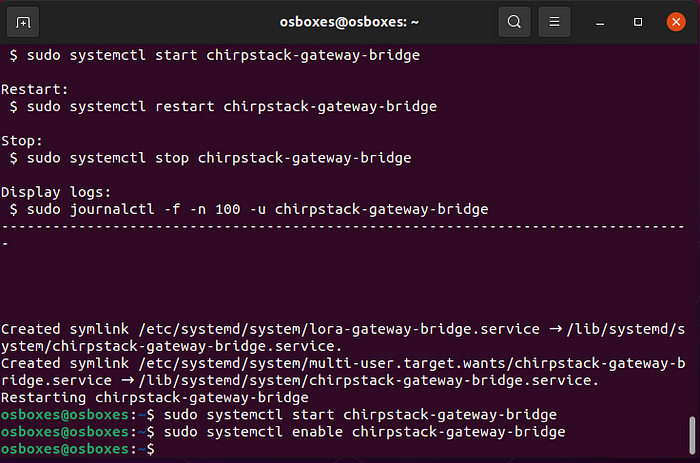
Instalar o ChirpStack Network Server na máquina virtual:
- sudo apt install chirpstack-network-server

Iniciar o chirpstack-network-server no arranque:
- sudo systemctl enable chirpstack-network-server
Editar o ficheiro de configuração:
- sudo nano /etc/chirpstack-network-server/chirpstack-network-server.toml
- Confirmar os valores:
# This configuration configures ChirpStack Network Server for the EU868 band using a MQTT
# broker to communicate with the gateways. Many options and defaults have been
# omitted for simplicity.
#
# For other bands, see the ./examples/ sub-directory.
#
# See https://www.chirpstack.io/network-server/install/config/ for a full
# configuration example and documentation.


# PostgreSQL settings.
#
# Please note that PostgreSQL 9.5+ is required.
[postgresql]
# PostgreSQL dsn (e.g.: postgres://user:password@hostname/database?sslmode=disable).
#
# Besides using an URL (e.g. 'postgres://user:password@hostname/database?sslmode=disable')
# it is also possible to use the following format:
# 'user=chirpstack_ns dbname=chirpstack_ns sslmode=disable'.
#
# The following connection parameters are supported:
#
# * dbname - The name of the database to connect to
# * user - The user to sign in as
# * password - The user's password
# * host - The host to connect to. Values that start with / are for unix domain sockets. (default is localhost)
# * port - The port to bind to. (default is 5432)
# * sslmode - Whether or not to use SSL (default is require, this is not the default for libpq)
# * fallback_application_name - An application_name to fall back to if one isn't provided.
# * connect_timeout - Maximum wait for connection, in seconds. Zero or not specified means wait indefinitely.
# * sslcert - Cert file location. The file must contain PEM encoded data.
# * sslkey - Key file location. The file must contain PEM encoded data.
# * sslrootcert - The location of the root certificate file. The file must contain PEM encoded data.
#
# Valid values for sslmode are:
#
# * disable - No SSL
# * require - Always SSL (skip verification)
# * verify-ca - Always SSL (verify that the certificate presented by the server was signed by a trusted CA)
# * verify-full - Always SSL (verify that the certification presented by the server was signed by a trusted CA and the server host name matches the one in the certificate)
dsn="postgres://chirpstack_ns:dbpassword@localhost/chirpstack_ns?sslmode=disable"

# Redis settings
#
# Please note that Redis 2.6.0+ is required.
[redis]
# Redis url (e.g. redis://user:password@hostname/0)
#
# For more information about the Redis URL format, see:
# https://www.iana.org/assignments/uri-schemes/prov/redis
url="redis://localhost:6379"

[general]
log_level=4

# Network-server settings.
[network_server]
# Network identifier (NetID, 3 bytes) encoded as HEX (e.g. 010203)
net_id="000000"


  # LoRaWAN regional band configuration.
  #
  # Note that you might want to consult the LoRaWAN Regional Parameters
  # specification for valid values that apply to your region.
  # See: https://www.lora-alliance.org/lorawan-for-developers
  [network_server.band]
  name="AU915"


  # LoRaWAN network related settings.
  [network_server.network_settings]

    # Extra channel configuration.
    #
    # Use this for LoRaWAN regions where it is possible to extend the by default
    # available channels with additional channels (e.g. the EU band).
    # The first 5 channels will be configured as part of the OTAA join-response
    # (using the CFList field).
    # The other channels (or channel / data-rate changes) will be (re)configured
    # using the NewChannelReq mac-command.
    #
    ##[[network_server.network_settings.extra_channels]]
    ##frequency=867100000
    ##min_dr=0
    ##max_dr=5

    ##[[network_server.network_settings.extra_channels]]
    ##frequency=867300000
    ##min_dr=0
    ##max_dr=5

    ##[[network_server.network_settings.extra_channels]]
    ##frequency=867500000
    ##min_dr=0
    ##max_dr=5

    ##[[network_server.network_settings.extra_channels]]
    ##frequency=867700000
    ##min_dr=0
    ##max_dr=5

    ##[[network_server.network_settings.extra_channels]]
    ##frequency=867900000
    ##min_dr=0
    ##max_dr=5

    disable_adr=true

    # Class B settings
    [network_server.network_settings.class_b]
    # Ping-slot data-rate.
    ping_slot_dr=0

    # Ping-slot frequency (Hz)
    #
    # Set this to 0 to use the default frequency plan for the configured region
    # (which could be frequency hopping).
    ping_slot_frequency=0


  # Network-server API
  #
  # This is the network-server API that is used by ChirpStack Application Server or other
  # custom components interacting with ChirpStack Network Server.
  [network_server.api]
  # ip:port to bind the api server
  bind="0.0.0.0:8000"


  # Backend defines the gateway backend settings.
  #
  # The gateway backend handles the communication with the gateway(s) part of
  # the LoRaWAN network.
  [network_server.gateway.backend]
  # Backend
  type="mqtt"


    # MQTT gateway backend settings.
    #
    # This is the backend communicating with the LoRa gateways over a MQTT broker.
    [network_server.gateway.backend.mqtt]
    # MQTT topic templates for the different MQTT topics.
    #
    # The meaning of these topics are documented at:
    # https://www.chirpstack.io/gateway-bridge/
    #
    # The default values match the default expected configuration of the
    # ChirpStack Gateway Bridge MQTT backend. Therefore only change these values when
    # absolutely needed.

    # Event topic template.
    event_topic="gateway/+/event/+"

    # Command topic template.
    #
    # Use:
    #   * "{{ .GatewayID }}" as an substitution for the LoRa gateway ID
    #   * "{{ .CommandType }}" as an substitution for the command type
    command_topic_template="gateway/{{ .GatewayID }}/command/{{ .CommandType }}"

    # MQTT server (e.g. scheme://host:port where scheme is tcp, ssl or ws)
    server="tcp://localhost:1883"

    # Connect with the given username (optional)
    username=""

    # Connect with the given password (optional)
    password=""


# Metrics collection settings.
[metrics]
# Timezone
#
# The timezone is used for correctly aggregating the metrics (e.g. per hour,
# day or month).
# Example: "Europe/Amsterdam" or "Local" for the the system's local time zone.
timezone="Local"


# Join-server settings.
[join_server]

  # Default join-server settings.
  #
  # This join-server will be used when resolving the JoinEUI is set to false
  # or as a fallback when resolving the JoinEUI fails.
  [join_server.default]
  # hostname:port of the default join-server
  #
  # This API is provided by ChirpStack Application Server.
  server="http://localhost:8003"
Reiniciar o chirpstack-network-server:
- sudo systemctl restart chirpstack-network-server
Ver a existência de erros:
- sudo journalctl -f -n 100 -u chirpstack-network-server
Iniciar o serviço e definir para iniciar sempre que a máquina virtual ligar:
Instalar e Iniciar o chirpstack-application-server:
- sudo apt install chirpstack-application-server
Iniciar o chirpstack-application-server no arranque:
- sudo systemctl enable chirpstack-application-server
Editar o ficheiro de configuração:
- sudo nano /etc/chirpstack-application-server/chirpstack-application-server.toml
Acrescentar "verysecret" em jwt_secret e [general] log_level=4 no documento.
# This configuration sets the required settings and configures an integration
# with a MQTT broker. Many options and defaults have been omitted for
# simplicity.
#
# See https://www.chirpstack.io/application-server/install/config/ for a full
# configuration example and documentation.

[general]
log_level=4

# PostgreSQL settings.
#
# Please note that PostgreSQL 9.5+ is required.
[postgresql]
# PostgreSQL dsn (e.g.: postgres://user:password@hostname/database?sslmode=disable).
#
# Besides using an URL (e.g. 'postgres://user:password@hostname/database?sslmode=disable')
# it is also possible to use the following format:
# 'user=chirpstack_as dbname=chirpstack_as sslmode=disable'.
#
# The following connection parameters are supported:
#
# * dbname - The name of the database to connect to
# * user - The user to sign in as
# * password - The user's password
# * host - The host to connect to. Values that start with / are for unix domain sockets. (default is localhost)
# * port - The port to bind to. (default is 5432)
# * sslmode - Whether or not to use SSL (default is require, this is not the default for libpq)
# * fallback_application_name - An application_name to fall back to if one isn't provided.
# * connect_timeout - Maximum wait for connection, in seconds. Zero or not specified means wait indefinitely.
# * sslcert - Cert file location. The file must contain PEM encoded data.
# * sslkey - Key file location. The file must contain PEM encoded data.
# * sslrootcert - The location of the root certificate file. The file must contain PEM encoded data.
#
# Valid values for sslmode are:
#
# * disable - No SSL
# * require - Always SSL (skip verification)
# * verify-ca - Always SSL (verify that the certificate presented by the server was signed by a trusted CA)
# * verify-full - Always SSL (verify that the certification presented by the server was signed by a trusted CA and the server host name matches the one in the certificate)
dsn="postgres://chirpstack_as:dbpassword@localhost/chirpstack_as?sslmode=disable"

# Redis settings
#
# Please note that Redis 2.6.0+ is required.
[redis]
# Redis url (e.g. redis://user:password@hostname/0)
#
# For more information about the Redis URL format, see:
# https://www.iana.org/assignments/uri-schemes/prov/redis
url="redis://localhost:6379"


# Application-server settings.
[application_server]

  # Integration configures the data integration.
  #
  # This is the data integration which is available for all applications,
  # besides the extra integrations that can be added on a per-application
  # basis.
  [application_server.integration]
  # Payload marshaler.
  #
  # This defines how the MQTT payloads are encoded. Valid options are:
  # * protobuf:  Protobuf encoding
  # * json:      JSON encoding (easier for debugging, but less compact than 'protobuf')
  # * json_v3:   v3 JSON (will be removed in the next major release)
  marshaler="json_v3"

  # Enabled integrations.
  enabled=["mqtt"]

    # MQTT integration backend.
    [application_server.integration.mqtt]
    # Event topic template.
    event_topic_template="application/{{ .ApplicationID }}/device/{{ .DevEUI }}/event/{{ .EventType }}"

    # Command topic template.
    command_topic_template="application/{{ .ApplicationID }}/device/{{ .DevEUI }}/command/{{ .CommandType }}"

    # MQTT server (e.g. scheme://host:port where scheme is tcp, ssl or ws)
    server="tcp://localhost:1883"

    # Connect with the given username (optional)
    username=""

    # Connect with the given password (optional)
    password=""


    # Settings for the "internal api"
    #
    # This is the API used by ChirpStack Network Server to communicate with ChirpStack Application Server
    # and should not be exposed to the end-user.
    [application_server.api]
    # ip:port to bind the api server
    bind="0.0.0.0:8001"

    # Public ip:port of the application-server API.
    #
    # This is used by ChirpStack Network Server to connect to ChirpStack Application Server. When running
    # ChirpStack Application Server on a different host than ChirpStack Network Server, make sure to set
    # this to the host:ip on which ChirpStack Network Server can reach ChirpStack Application Server.
    # The port must be equal to the port configured by the 'bind' flag
    # above.
    public_host="localhost:8001"


    # Settings for the "external api"
    #
    # This is the API and web-interface exposed to the end-user.
    [application_server.external_api]
    # ip:port to bind the (user facing) http server to (web-interface and REST / gRPC api)
    bind="0.0.0.0:8080"

    # http server TLS certificate (optional)
    tls_cert=""

    # http server TLS key (optional)
    tls_key=""

    # JWT secret used for api authentication / authorization
    # You could generate this by executing 'openssl rand -base64 32' for example
    jwt_secret="xxxxxxxxxxxxxxxxxxxxxxxxxxxxxxxxxx="


# Join-server configuration.
#
# ChirpStack Application Server implements a (subset) of the join-api specified by the
# LoRaWAN Backend Interfaces specification. This API is used by ChirpStack Network Server
# to handle join-requests.
[join_server]
# ip:port to bind the join-server api interface to
bind="0.0.0.0:8003"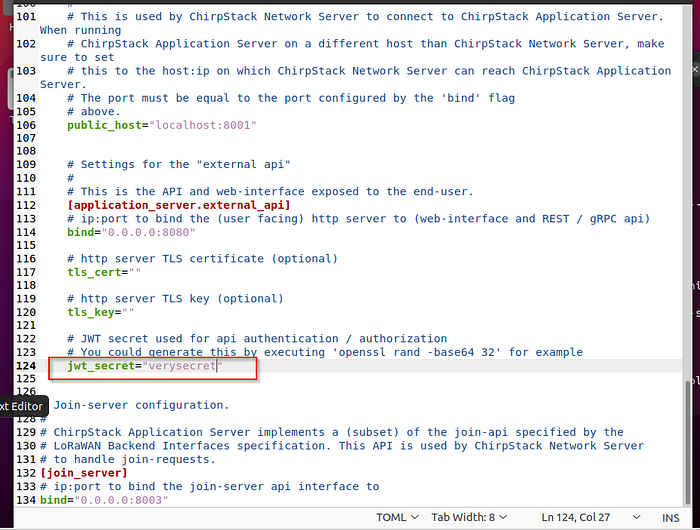

Gerar um “segredo” seguro (jwt_secret):
- openssl rand -base64 32

Substituir esta chave por "verysecret" acima mencionado.
Reiniciar chirpstack-application-server:
- sudo systemctl restart chirpstack-application-server
Imprimir o output de logs para ver se existem erros:
- sudo journalctl -f -n 100 -u chirpstack-application-server
Se tudo correr bem este será o output:


Configurar o gateway a partir do browser
Aceder ao endereço estático configurado acima com a porta 8080:
As credenciais são "admin" para o username e "admin" para a palavra-chave

Este é a tela do ChirpStack

Criar network server:
- Network-servers
- ADD
Network-server name: Podemos dar o nome que quisermos
Network-server server: localhost:8000 (Porque estamos a usar uma máquina virtual e definimos no registro acima este endereço e porta.)
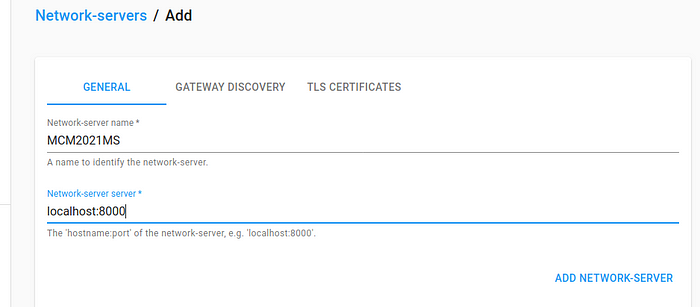

- ADD NETWORK-SERVER

Criar um perfil do Gateway com o Network-server:
- Gateway-profiles
- CREATE

- Name: Podem preencher ao seu critério
- Stats interval: 30
- Enabled Channels: 8, 9, 10, 11, 12, 13, 14, 15,65
- Network-server: Usar o criado anteriormente
- Add Extra channel
- Na frequência, ter em atenção e usar a mesma que está no Gateway
- CREATE GATEWAY-PROFILE
Criar um Service-profile:

- Service-profile name: Nome ao critério
- Network-server: selecionar o criado anteriormente
- Selecionar Add gateway meta-data e Enable network geolocation
- Device-status: 24
- Minimum allowed data-rate: 2
- Maximum allowed data-rate: 6
- CREATE SERVICE-PROFILE
Criar um Device-profile:
Em Join:
Class B:

Class C:
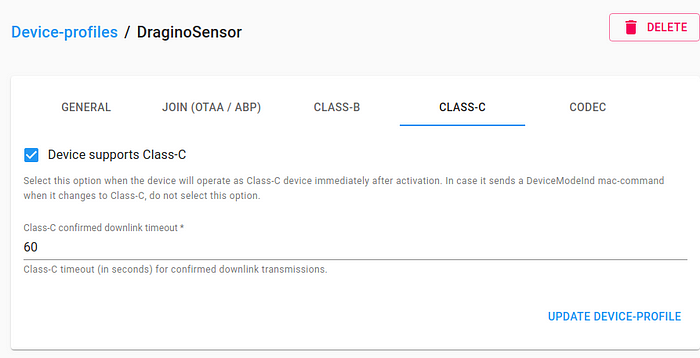
Criar o gateway e associar o perfil:
- Gateway name: Ao seu critério
- Gateway description: Ao seu critério
- Gateway ID: MAC Address do Gateway
- Network-server: Usar o criado
- Service-profile: Usar o criado
- Gateway-profile: Usar o criado
- Ativar Gateway discovery enabled
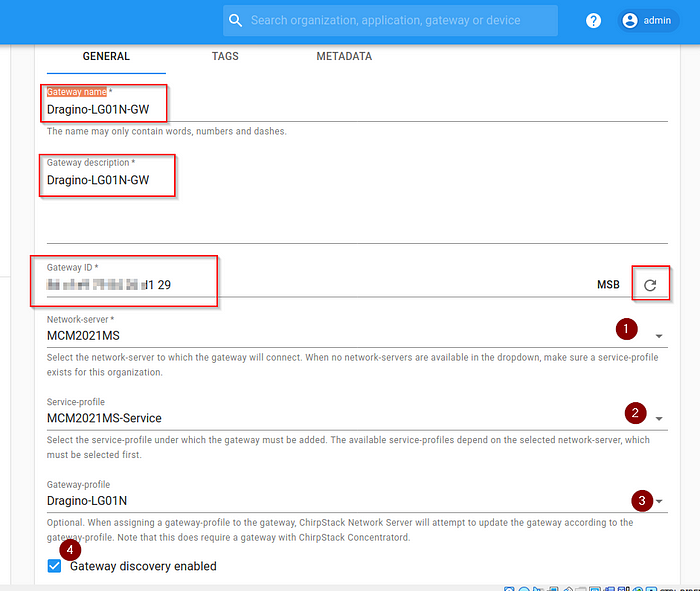
- CREATE GATEWAY
Testar se o gateway está se comunicando com o ChirpStack no envio de pacote de conexão, ou seja, deve configurar o Gateway para apontar para o ChirpStack.
Subscrever ao tópico MQTT do gateway:
- mosquitto_sub -v -t "gateway/#"
*Estes caracteres demostram que o tópico foi subscrito com sucesso.
Criar uma aplicação:

- CREATE APPLICATION
Criar um dispositivo na aplicação:

Device EUI: A primeira vez, podem gerar um, posteriormente podem usar esse.

No separador Activation:
A primeira vez gerar as chaves:

mosquitto_sub -t "application/#" -v Kit de avaliação para módulo LoRa e Sigfox Wisol Seong JI SJI LSM110A
Operação em rede pública e privada LoRaWAN e também ponto a ponto (P2P)
Opera também em Sigfox
Alterne entre LoRa e Sigfox por comando AT, não precisa trocar o Firmware!
Permite embarcar sua aplicação
Módulo LoRa e Sigfox Wisol Seong JI SJI LSM110A
Módulo LoRa e Sigfox compacto
Escolha entre operação LoRa e Sigfox por comando "on the fly", sem precisar trocar firmware !
LoRa: para operação redes públicas e privadas LoRaWAN bem como ponto a ponto (P2P)
Sigfox: zonas RCZ2 e RCZ4 (inclui Brasil)
Caracteristicas:
- Permite embarcar a aplicação
- Dimensão: 14x15x2,8mm
- Frequência: RCZ2 Tx 902,2MHz Rx 905,2MHz
- Potência de saida: configurável até +22dBm
- Sensibilidade: -129dBm@LoRa(BW=500KHz, SF=12)
-124dBm@Sigfox(0.6Kbps)
- Tensão de operação: 1,8 - 3,6Vdc
- Interface UART 9600 8N1
- Baixo consumo
- Na operação P2P não necessita de gateway LoRaWAN
Aplicações:
- Medição individualizada de água, energia, gás
- Automação comercial, industrial residencial;
- Rede de sensores;
- Sistemas de alarme e segurança;
- Estações meteorológicas;
- Automação agrícola.
Ref:
https://www.chirpstack.io/docs/getting-started/debian-ubuntu.html
MQTT - ChirpStack open-source LoRaWAN<sup>®</sup> Network Server
Connecting a device - ChirpStack open-source LoRaWAN<sup>®</sup> Network Server
Base64 to hex: Encode and decode bytes online - cryptii
Connect aws ec2 server using pem file with putty in windows OS - YouTube


Nenhum comentário:
Postar um comentário